Canon 6d Setting Continuous Shooting Mode
This chapter is from the book
Setting Up Your Camera for Continuous Shooting and Autofocus
One of the biggest challenges you will face when capturing fast-moving subjects is getting that one perfect frame when the subject is in focus and positioned exactly where you want them. With a few changes to the camera settings on your 6D, you can overcome these challenges. Let's now talk about drive modes and AF (autofocus) modes.
Drive Modes
The drive mode dictates how fast each photo is taken and how many photos are captured with each press of the shutter release button. The drive modes available on your camera are the following:
- Single shooting: With this setting, you will take only one photograph.
- Continuous shooting: When you press and hold the shutter button, photographs will be taken at a speed of 4.5 shots per second.
- Silent single shooting: With this setting, the sound made when you press the shutter release button will be minimal.
- Silent continuous shooting: If you want to shoot a series of images rapidly but also keep the noise of your shutter down, use this setting.
- 10-sec. self-timer/Remote control: Self-timer mode. The camera delays 10 seconds from the time you press the shutter release button to the time that a photograph is taken.
- 2-sec. self-timer/Remote control: Self-timer mode. The camera delays 2 seconds from the time you press the shutter release button to the time that a photograph is taken.
The best option for action and sports photography is the Continuous shooting mode. It allows you to capture up to 4.5 images per second continuously, ensuring a higher likelihood of getting that one great shot. But keep in mind that if you use this drive mode often, you will fill up your memory cards much faster than if you were just taking a single photo at a time.
The size of the memory buffer on your camera, the image format (JPEG or RAW), and the speed of your memory card limit how many seconds you can use the Continuous shooting mode. The digital image files on your 6D are constantly being written to the memory card as you take photos. But when you take multiple images in a row, the camera stores these digital images inside the memory buffer on the camera itself until it can write the images to your memory card. The speed at which this data is processed and written to your card depends on the speed (or Class rating) of your card, as discussed in Chapter 2.
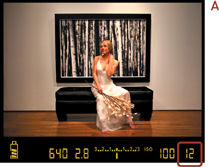
When you hit the buffer's limit, the camera will temporarily freeze and you will see the word "BUSY" in the viewfinder. You will not be able to continue taking photos until the camera has caught up with the backlog of images it is writing to the SD card. The best way to avoid this is to keep an eye on the maximum burst indicator in the lower-right corner of the viewfinder (A) and the rear LCD screen (B). It shows the maximum number of photos you can take before you hit the buffer wall and have to wait until the buffer clears.
Increasing Your Chances of Getting "The Shot"
The Continuous shooting mode is not just for fast-moving subjects such as those in sports or action photography. It can also be used to capture subjects that are moving slowly but sporadically, such as wildlife or small children. Figure 4.7 shows how a series of images from one second of shooting can mean the difference between an out-of-focus image and coming home with a winner.
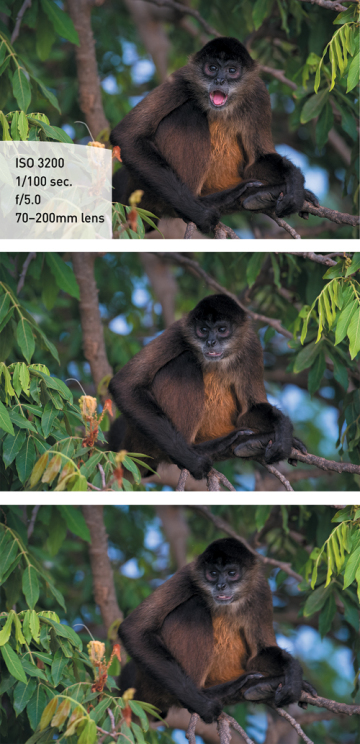
Figure 4.7. This monkey was constantly moving around as it sat on the tree branch. The best shot (top) was the third image of a series that was taken within a second of shooting.
Setting Up and Shooting in High-Speed Continuous Drive Mode
- Press the DRIVE button on the top of the camera (A).
- Rotate the Main dial until you see the icon that looks like stacked-up rectangles.
- Locate and focus on your subject in the viewfinder, and then press and hold the shutter button to take several continuous images.
Focus Modes
Now that you have a good understanding of the drive settings, let's talk about the AF (autofocus) system. The 6D allows three autofocus modes: One Shot, AI Focus, and AI Servo (AI stands for artificial intelligence). One Shot mode is designed for photographing stationary subjects, but it is not very useful with action photography. When capturing subjects that are on the move, you will need a focus mode that can keep up with them—AI Servo mode is most likely your best bet. When you press the shutter button halfway while in this mode, the AF tracking system engages and attempts to follow along with your subject.
AI Focus mode is meant to be the best of both worlds between One Stop and AI Servo. It is useful when your subject is stationary at first but then begins to move. A perfect example of this is runners about to start a race. As they line up, you might want to focus on their shoes or facial expressions, and once the race starts, you don't want to have to jump into AI Servo mode. AI Focus mode would cover your needs for both.
Selecting and Shooting with an Autofocus Mode
- Press the AF button on the top of the camera (A).
- Use your index finger to rotate the Main dial until the desired AF mode is selected.
- Locate your subject in the viewfinder, then press the shutter button halfway (hold this position if using the AI Focus or AI Servo modes). A beep indicates that focus has been achieved, and one of your focus points will light up red.
- Press the shutter button down completely to begin taking a photo.
You should note that holding down the shutter button to continually track your subject for long periods of time will drain your battery quickly. Another option is to use the AF-ON button on the back of your camera (B) to achieve focus. That way you don't have to worry about taking unwanted photos while attempting to focus on your subject.
AF Points
The 6D has 11 focus points and two autofocus settings: Manual selection and Automatic selection. Manual selection lets you choose a single focus point (A), and Automatic selection allows the camera to decide which points to focus on (B).
There are three things to take into account about AF point selection:
- When you are using any of the Basic zone shooting modes, you will only be able to use Automatic selection.
- The AF point in the center is generally the most accurate when it comes to achieving focus.
- You always have the ability to lock your focus and then recompose your image before taking a photo. To do this, press the shutter button halfway or press the AF-ON button to achieve focus on your subject. Continue holding down the shutter button or AF-ON button, and recompose your image. When you are happy with the composition, press the shutter button down completely to take the photo.
spellmanrouresing77.blogspot.com
Source: https://www.peachpit.com/articles/article.aspx?p=2062173&seqNum=7
0 Response to "Canon 6d Setting Continuous Shooting Mode"
Post a Comment